With many SLPs delivering services distantly, green screens have become really popular! My son has used one to create videos for school projects, so I was a little familiar. I decided to start exploring it myself and how it can be used in Speech Therapy for distance learning and teletherapy purposes. It’s surprisingly easy and a fun way to engage kids! You can set up a green screen for speech therapy easily in a few steps. I’m sharing all the details below. Quick hint: it doesn’t actually NEED to be green. You can use a blue sheet or any other solid color. I chose a felt green material because my accessory items can easily stick if they are backed with felt. Some links are Amazon affiliates to help support this blog.
You can check out pirate-themed green screen activities and Arctic Animals Green Screen Activities
How to set up a green screen for Speech Therapy:
- Find a blank wall space with at least 6 ft.
- Set up your table and chair – Consider using a rolling chair or simply stand if you will need to move side to side to point and reach things. The rolling cart from Michael’s is my favorite for holding easily accessible items needed for green screen activities.
- Camera – you can use an iPad, document camera, or your laptop camera (some Macbook pros are too wide – just play with the background)
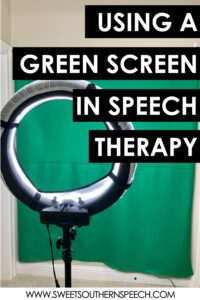
- Cover all-natural lighting (windows) – you will get a halo effect around your head if you use anything other than artificial lighting.
- Get 6ft. x 6ft. (or larger) green felt fabric, a green table cloth, or bulletin board paper will work also. Use Command Strip hooks and tension rod and clip rings to hang the screen. This is great if you need to take it down frequently. I got my felt fabric from Hobby Lobby.
- Accessories: green felt pocket (IT ABSOLUTELY MUST BE THE SAME COLOR) with velcro on the back to attach- (I actually just got an extra 1/2 yard of felt to make mine), green sticks (can use wooden dowels like for photo props, painted green), magnifying glass, flashlight, binoculars, felt-backed manipulatives (cut out clip art).
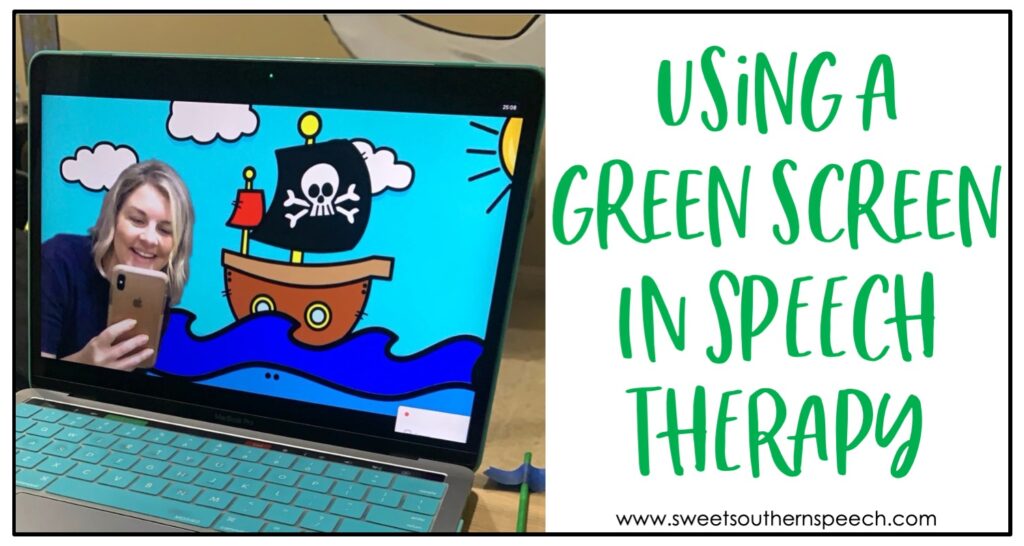
- Background images: you need JPEG images in 16×9 format. I’ve created a fun Pirate-Themed Green Screen set!
Adding your virtual background:
Using Zoom:
You need to use Zoom to have a green screen. Create a Zoom account, enable the green screen feature, then share your screen. Use the up arrow in the bottom left corner (just to the right of the “stop video”). Select “choose a virtual background.” In this pop-up window make sure to select “I have a green screen” and unselect “mirror my video” on the bottom. To add your own background JPEG image, click the + beside “Choose Virtual Background.” To make your background really clear, color check by clicking on the screen around you.
Using Google Meet:
Set up Zoom FIRST. This is just for your background so you don’t have to be HIPPA compliant. Then reduce your Zoom window and open a separate window and go to your Google Meet calendar and join the meeting. Select to turn off the Google Meet camera (remember you are using the Zoom virtual background). Then select “join now” on the Google Meet window.
Click “present now” in the bottom right using “a window.” Then select the Zoom camera (you should see yourself). You can slide over the Google Meet window to make a “split-screen” so you can see both your camera window AND the Google Meet window. This is especially helpful if you are changing backgrounds in the middle of your sessions.
Fun ideas for using a green screen in Speech Therapy:
Stick items
Use green painted sticks, or green straws, with character cutouts on the end (attach with Velcro). This is fun to hold to work on positioning goals: “Put the ball on the table,” “put the ball under the table.” Kids can give you directions and you move the item.
Books and PDFs
Take pictures of each page of a picture book (horizontal is best) then upload them to your computer. Open PowerPoint and change the page ratio to horizontal with a size of 16×9. Insert your camera photos. Then save as JPEG.
Take a screenshot of any PDF like those from my Teachers Pay Teachers store. To do this, open the PDF full screen then take a screengrab and include horizontal borders to get that wide ratio. This will mean you will have black or white space on the sides. That’s ok! If you try to use a regular vertical image, it will appear stretched as a background.
Name and save all of your background images in one folder on your computer. When you go to upload a background in Zoom as described above, you will insert these images.
Magnifying glass
Kids LOVE this… it’s like magic and holds their attention like nothing else.
To set up your magnifying glass (fun for a bug theme) or binoculars (fun for a safari theme), cut out a circle of blue construction paper to put over the glass area. Go back to “choose background” (bottom left corner like before) on your Zoom window. You will put your mouse cursor over the blue paper and click to select. That way, it will show the background ONLY where you hold the magnifying glass.
Flashlight
This works similarly to the magnifying glass. Cut a rectangular-shaped piece of blue construction paper with one end wider. Tape the narrow end to the end of the flashlight (think of how a flashlight shines out) but don’t turn the flashlight on. So, wherever you “shine the light” (hold the blue paper) the image on the screen will show. Again, magic!
A fun way to make items disappear or “feed” an animal. This pocket must be the same exact color of the green screen – this is why I just got extra felt fabric to make mine. Mine is about 12×14. It just needs to be big enough for your hand to fit in easily and all the manipulatives to fit inside also. I created a pocket by hot gluing the sides together. Put Velcro dots on the back 4 corners to easily place and adjust on the screen wherever you need it. You can position it with the opening at the top or horizontal. You might find it helpful to have 2 or 3 equally spaced out to use no matter where you are positioned.
When using the Pirate Green Screen backgrounds, you can “bury treasure” by putting articulation or task cards in the “sand hole,” or “load the cannon!” These fun interactive themes are so engaging to kids!
Getting started with a green screen:
Practice before your first session to get comfortable – you’ll want to adjust your seating position, handling any props, knowing your camera angle, etc. Set up a mock session by having a friend SLP, spouse, or kid join a session from another device.
I can’t stress this enough.
Do not feel pressure to be constantly changing your backgrounds. Use one background but change your manipulatives instead. This is especially fun for working on positional items, following directions, or “what’s wrong.”
Looking for more inspiration? There is a great Facebook group for Green Screen Speech Therapy!
Also, Play Spark Toys has a ready-made kit for purchase!
I hope these tips help you get started using a green screen in your speech therapy sessions!
Make sure to follow my Instagram account: @literacybasedspeech where I share books and how you can use them in your sessions.